Sashiko Boro Knots Cover

Sashiko Boro Knots and more | Follow-up Video

I summarized the wisdom of “Sashiko Overlay stitching (not making knots in Sashiko)” in the previous blog post. I tried my best, but I felt that the writing wasn’t good enough to share the whole picture I wanted to express. So I made a follow-up video about Sashiko Boro Knots and much more & its transcript.

Sashiko Boro Knots are on the same page

We tend to fantasize the words, especially when it is not in our language, but Sashiko Boro Knots are on the same page & category. They are all on the one line of “how to appreciate the fabric and care for the others”.

I hope I explained well in this follow-up video.

https://www.youtube.com/c/sashico

Script for the Follow-Up Video

Hello.

Thank you for watching our Sashi.Co videos. This is Atsushi.

Today, I would like to talk about a topic of, “Do we make a knot in Sashiko stitching?” from a cultural perspective. I was raised in an environment that every artisan usually did not use knots in the beginning and ending of Sashiko stitching. Therefore, it wasn’t even a question for me to explain if we use knots or not. I hope I can share the reasons why we do overlay stitching instead of making knots. It is wisdom in Sashiko.

Do you see that the little thread tale there?  That is the point we stop the thread by doing overlay stitching. We could have cut the thread tale completely off to make the backside of this piece as the finished side. And, yes, it is the backside, wrong side, or hiding side of the Sashiko stitching.

The side you are looking at now is the front side or finished side of this Sashiko project. And then, we flip the fabric, and it is the backside of the Sashiko project. The goal of the wisdom in not making knots is to finish both sides of the fabric as beautiful as the finished side.

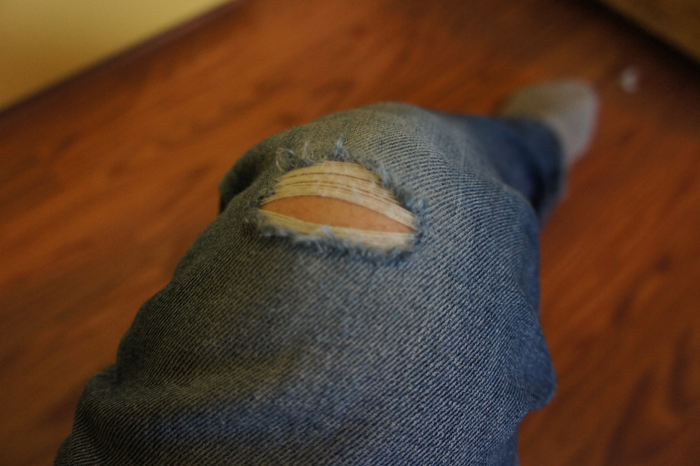
At some point in the history, in some rural village in Japan, they didn’t have enough fabric to use for lining. Therefore, they needed to use the single layer fabric as the “finished” piece. It is wisdom & technique to maximize the fabric by Sashiko.

For the technique of “Sashiko with not making knots”, please check another video in this Sashi.Co Channel. I have explained how to do overlay stitching there.

How about Boro and knots in stitching.

It is case by case and hugely depends on your preference. Therefore, I would need to explain it by using several examples such as Boro-inspired, and Boro to piece, and Boro we revived over time.

Boro-Inspired Piece.

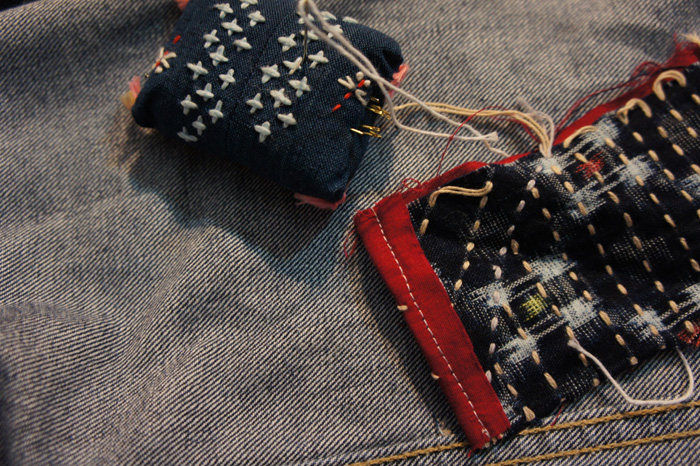
The fabric on the screen is the finished side of Boro-Inspired piece we made. We find the vintage Japanese fabric with severe damage, and patch them to make the fabric look like Boro. This piece requires many spot mending with “flayed fabric”, so we needed to use the knots to keep the fabric secure. Please confirm that the knots are relatively big in comparison to the other sewing projects. It is because the vintage fabric is so fragile that the small & tight knots could damage the fabric instead of holding it together even if we use the Sashiko thread we recommend. It is kind of the part where “art” kicks in to make Boro-inspired fabric with using the appropriate fabric with the appropriate knots, as knots as the part of Boro.

Boro to be fabric.

The fabric on the screen now is so-called “Boro to be fabric” that we have been working on. When we get a good vintage fabric with good condition, we enjoy patchworking them with thinking to make it Boro in the future by using it in our ordinary life. I started working on this fabric in 2018, so it is a pretty new piece. I try to avoid knots as much as possible. It is my preference that I would like to have the softness of overlay stitches. The fabric isn’t frayed or severely damaged so I can secure the stitches with just overlay stitching and our Sashiko thread. Please understand that I am not saying, “I never use knots”. There are some parts that I use knots in this project as well. This is an example of Boro to be fabric with as fewer knots as I can.

Boro we revived.

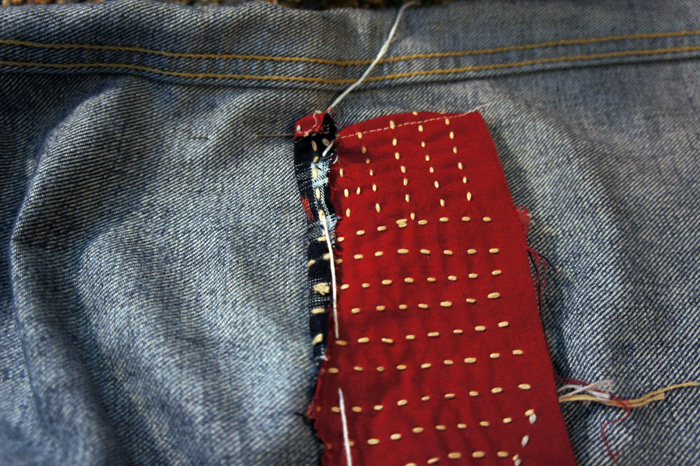
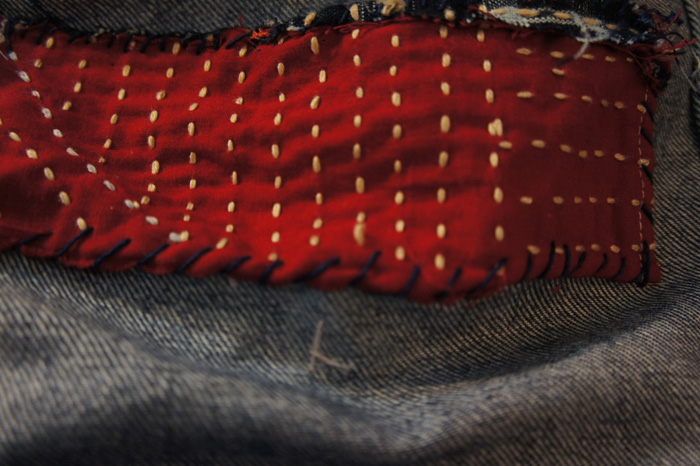
The last piece I introduce is the Boro we revived. I think there are many ways to define the Boro. One definition we have is that the Boro is the piece of fabric after so many usages and continuous repair. The fabric on the screen is one example we followed this “using” and “repairing” process. It looked like the Boro to be fabric at the beginning of the project, and over time, we kept practicing Sashiko on it. This fabric needed to use the knots to repair, and also we kept stitching with overlay stitching. You can see both of them in the piece.

I hope this video explains that there is no such thing as the “definitive answer” to the question for Sashiko stitching knots or not. After all, it is all about the preference, and you can do what you would like to do. As a Sashiko artisan who was raised in the Sashiko environment, I just wanted to share that there is more than “technique” in these topics.

Previous Article

Modern Denim Fashion 2

Modern Denim Fashion with Japanese Sashiko

The word of Sashiko is getting popular in many industries, even in a field of fashion. As the Sashiko artist, I am happy that people get inspired by the image of Sashiko. Although some seem to misunderstand what Sashiko is, the spreading the concept of Sashiko matters first. As a part of my Sashiko challenge in 2017, I restarted practicing Sashiko on the denim fabric. I hope my sample pieces would influence the modern denim fashion, and contribute to the actual Sashiko culture, “the repurpose, appreciation to the fabric, and sustainability.”

*Please refer to the previous article regarding my understanding to Sashiko and its definition. 


The fabric lasting longer by rich stitching

Sashiko is a form of stitching to repair, mend, and strengthening the fabric. The famous Japanese vintage fabric “Boro” is the result of repeated Sashiko stitching. Sashiko is well-known for patching and mending the hole in the fabric and torn fabric. In the modern society, Sashiko transformed its concept a bit and now well-known for decorative stitching from Japan.


In my Modern Denim Fashion projects, I perform both stitching to strengthening the fabric and mending the torn fabric. The fabric gets much stronger by having so many rich stitching. When the fabric is stronger, the denim garment can last longer. The longer we can use the garment, the more appreciation we can have to the fabric.

Wouldn’t it be nice if the garment with Sashiko is even more beautiful (fashionable) with stitching?

Hand-Stitched Sashiko Jeans 223


The possibility in Sashiko with Modern Denim Fashion

Every stitch is done by hands… Therefore, I cannot produce many samples in the short period of time. However, I hope, these samples with Sashiko stitching will influence the modern denim fashion field and spread the concept of Sashiko. It is very difficult to change the mass-production and mass-consumption society. I do not intend to criticize this beneficial industry. In fact, I get to benefit from mass-production. I just would like to spread the concept of appreciation to the fabric, mending and repairing, and ultimately, “repairing it instead of replacing it.”


Modern Denim Fashion 23


Please wait for my update with more samples. I believe we can surprise the world.


*You can purchase the swatches of sashiko fabric to patch (stitch-on) to your garment instead of stitching directly. 


Wallet Sashiko Boro Repair 1

Wallet Sashiko Boro Repair Project

Since 2012, I have been using a Sashiko card-holder as a wallet to carry my debit/credit cards. After repeating putting my jeans pocket so many times, even the Sashiko fabric start getting torn. When I share the photo on Instagram, many people reacted to the photo how interested they were to see the process of repairing. It became like a Boro mending, so here is my Wallet Sashiko Boro Repair Project.

Repair it instead of Replace it

My wallet looks like the photo. There are some holes. The edge of wallet started fraying. Soon or later, the wallet will be completely torn and it will not function as the card-holder. Replace it, or repair it to reuse it.

Wallet Sashiko Boro Repair 0


First, the most important step. Preparing the Sashiko fabric to patch. I prepared several kinds of Sashiko fabric to see which one is the most appropriate fabric.s

Wallet Sashiko Boro Repair 2


Choosing the “right” fabric for the project is very fun part. I spend good amount of time to decide the one would be great on Wallet Sashiko Boro Repair Project.


Wallet Sashiko Boro Repair 3


After selecting the fabric, the repairing stitch start. Unlike the Sashiko running stitch, repairing takes more time, one stitch by one stitch. Since the needle go through several layers of fabric, it is so hard to push through the needle. The pain of my finger is the by-product of this beautiful Wallet Sashiko Boro Repair.

Here is the photo of before and after.

Wallet Sashiko Boro Repair 0 Wallet Sashiko Boro Repair 1


The repair for inside wasn’t necessary much. I made a few stitches to reinforce the patch I made outside. The few stitches look pretty unique as well.


Wallet Sashiko Boro Repair


The Concept of Wallet Sashiko Boro Repair Project

“Upcycle” and “Repurpose” are the keywords on our projects. When I realize my personal belonging (besides pairs of jeans) requires the Sashiko and Boro mending project, I was excited to repair that. The more I repair the fabric, the more I feel the attachment to the item. Using one item with care instead of replacing them every time you see the damage is the key concept of our activities.


The Wallet looks a bit like a Boro piece. By repeating the repairing, it will be more beautiful like the other famous boros. We, whoever interested in Sashiko and I, are creating the future Boros.

Sashiko mending project in one warm day.

(This is a revised article about Sashiko Mending from the website of Sashi.Co & Keiko Futatsuya.)

We have more articles about Sashiko Mending in our website category: Upcycle Stitches Sashiko Mending


Surprisingly nice warm day in February of Pensylvania. I decided to do a small Sashiko mending project in a warm sunlight. What do you do when you find a hole in your jeans? I repair it with Sashiko stitching. Sashiko Mending Project, here it goes!


Sashiko Mending Process with pictures

Match the Sashiko fabric to jeans. Ah… it is so bright and warm outside. I have been waiting for this warm day over severe winter in Central PA.

The Sashiko fabric in the photo is the leftover (the edge after trimming) from different Sashiko project by “Sashi.Co & Keiko Futatsuya.” Preparing and making the Sashiko fabric is the most enjoyable part of Sashiko… and picking the best matching fabric is the most exciting time. I choose this Japanese vintage fabric, layered with red vintage one.

Preparing and making the Sashiko fabric is the most enjoyable part of Sashiko… and picking the best matching fabric is the most exciting time. I choose this Japanese vintage fabric, layered with red vintage one.

Sashiko Mending 2


The fabric has 2 layers. It looked a bit frayed on the edge.

Therefore, I used a sewing machine to trim the edge for easier repair.


Next… Prepare the needle and thread.

Sashiko Mending 2


Use any thread to do Basting. It will be removed after performing actual Sashiko.

No need to do it if the project is simple. I still need to do basting to get the better result… more practice.

Sashiko Mending 4


I used blind stitching technique here to attach the fabric to the jeans.

Yes, I am patching the fabric from the back so the jeans will have the main fabric from the hole. I also used the Natural Indigo Dyed Sashiko thread here. The better Sashiko thread I use, the better result I get. Don’t forget to use our Sashiko thread for the best purpose.

Sashiko Mending 3

Sashiko Mended / Repaired Jeans is cool, I believe.

Done! I am pretty satisfied the result. It will get better by using this pair of jeans since the damage will make it more natural.

Mending Sashiko Jeans

Mending Process 5

It took about 1 ~ 2 hours to complete the mending and repairing process, including the matching the fabric time and excluding the Sashiko fabric preparation. Again, It doesn’t include the time of preparing Sashiko fabric.

Upcycle it to get another value.

Sashiko is a process of repairing/reinforcing the fabric to repurpose. Upcycing the fabric is our daily mission.

I hope this small project will share some insight into the beauty of Sashiko and mending.


Sashiko Mending Jeans / How I enjoy Sashiko

When I start introducing Sashiko in English about 10 years ago, the word of SASHIKO wasn’t popular among the general public. People in patchworking and quilting were eager to learn the Sashiko stitching techniques. I remember my challenges to try to reach out to quilting and patchworking enthusiastic people. Recently, I meet new people with the knowledge of Sashiko, and these people come across to Sashiko throughout mending. Sashiko Mending Jeans are especially popular among the new fashion.

People in patchworking and quilting were eager to learn the Sashiko stitching techniques. I remember my challenges to try to reach out to quilting and patchworking enthusiastic people.


Sashiko in Fashion Industry.

Recently, I meet new people with the knowledge of Sashiko, and these people come across to the word of SASHIKO throughout mending the fabric. Especially, Sashiko Mending Jeans seems to be popular, I assume. Interestingly, it is “Mending jeans with Sashiko” that I enjoy the most in Sashiko.


Sashiko Mending Jeans -1


Sashiko Mending Jeans as a cool item

I was raised in the Sashiko family. Sashiko was always around me. However, I didn’t feel comfortable wearing most of Sashiko products in daily life simply because it wasn’t fashionable in the 21st century. As the side project of my regular Sashiko work, I started working on my garments like denim jeans,  jacket, cotton shirts and so on. Then, I realize how cool Sashiko can be. It was around 2010 ~ 2011, then the time of realization how important it is to pass down Sashiko to the next generation comes to me after the earthquake in Northeast of Japan.


Sashiko is a process, not the result

Here are some photos of my jeans that I am working on mending, and wearing pretty much every day. Sashiko is not only the result. I start realizing the Sashiko is the process of mending, repairing, and reinforcing the fabric. Sashiko Mending Jeans will not be the end product since it requires repetitive patching and stitching. When I sell my Sashiko mending jeans, I would like to teach the buyer how to Sashiko it by himself/herself. Anyway, here is a serious of photos, as of today.


I did Sashiko mending on this jean a month ago

(I blogged it, too)

However, mending (sewing) means adding extra tension to the part of fabric without stitching. Therefore, the part without Sashiko thread starts getting torn. Then, I would need another mending project. This is why I say that Sashiko is the process, not the result. It is perfectly fine since it is fun doing it, and the more mending projects I would do, the Sashiko mending jeans get fashionable. (By the way, I believe “Boro” is the result of this repetitive mending with Sashiko. I am making Boro in future now!)

Sashiko Mending Jeans 2


A hole. Thinking how to make Sashiko stitching on

Sashiko Mending Jeans 3

I cover several methods of Sashiko mending in my workshop. It is a fun part for me to think what to do. I will update the result after I do Sashiko mending.


Preparing Sashiko fabric and matching it

Sashiko Mending Jeans 4


Although I haven’t started actual mending process, I have prepared the Sashiko fabric to patch. Using Japanese vintage fabric with Natural Dye Sashiko thread, it will be a fantastic match.


I have a plan to make a serious of tutorial… wait for the update and keep stimulating me by leaving comments or messages so I will get motivated a lot faster.


Thank you for reading.

Enjoy Sashiko!